
Swagbucks
This is the best way to get free stuff online. It is super simple, all you have to do is search using their search engine, just like you would do with google. When you search, you will earn swagbucks. Once you get enough swagbucks, you can get a free prizes! Iphones, Mp3s, instruments, ext.
And, unlike other sites, swagbucks doesn't want your creditcard or other harmful information. And I'm really writing this post because i thought it was a good site, not because i was paid to do it or something. I think you should check it out, using this link. Send your friends this link to, they would love the site!
Swagbucks
Wednesday, August 19, 2009

Thursday, June 25, 2009
The 'Rush' Project
Today I'm announcing my newest project: The 'Rush' Project.
Basically, I'm creating a blender animation to commemorate all the albums from the rock band, Rush. (The best band ever!)
To do this, first I'm recreating all the rush albums in 3D. Some of them are hard, so I'm just mapping the texture and making parts of it in 3D. Other albums, I will recreate 100% in blender. I will then animate them with cool effects and of course, Rush music playing in the background. I'm still in the planning stages, but here is some of what Ive done just to test-
Actual album:

My (partly) 3d blender version:
And from the side:
Hopefully I will finish this one soon. Until then, check here for updates!
-Drummeralec
Basically, I'm creating a blender animation to commemorate all the albums from the rock band, Rush. (The best band ever!)
To do this, first I'm recreating all the rush albums in 3D. Some of them are hard, so I'm just mapping the texture and making parts of it in 3D. Other albums, I will recreate 100% in blender. I will then animate them with cool effects and of course, Rush music playing in the background. I'm still in the planning stages, but here is some of what Ive done just to test-
Actual album:

My (partly) 3d blender version:

And from the side:

Hopefully I will finish this one soon. Until then, check here for updates!
-Drummeralec
Blender 2.5 Test Build
Wow, long time no post ;P. Well, it's summer now, we all know what that means- more blender, graphics, and cool stuff to show you!
I'm sure some of you have been following the new Blender 2.5 project. If you haven't, check it out here:
http://www.blender.org/development/current-projects/blender-25-project/
 Here is where you can find a test build of blender 2.5. Remember, it is still in the development stage, so a lot of the features are missing. I suggest you check it out too, its really cool!
http://www.graphicall.org/
-Drummeralec
I'm sure some of you have been following the new Blender 2.5 project. If you haven't, check it out here:
http://www.blender.org/development/current-projects/blender-25-project/
 Here is where you can find a test build of blender 2.5. Remember, it is still in the development stage, so a lot of the features are missing. I suggest you check it out too, its really cool!
http://www.graphicall.org/
-Drummeralec
Sunday, May 10, 2009
Vic Firth Drum Practice Pad made in Blender
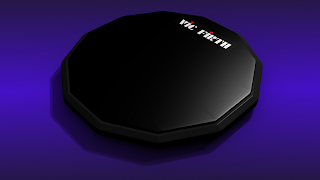
Hey guys! Sorry for not posting in a while. I have a lot of tryouts and tests coming up, and I'm not getting that much time on my computer. Here is a small "30-minute" project i made in blender just for fun. I made a Vic Firth drum practice pad, what drummers like me bang on to practice :).
Here is what it looks like in real life-

And here is my Blender Version! -
Well, thanks for looking. Feel free to comment!
-Drummeralec
Here is what it looks like in real life-

And here is my Blender Version! -

Well, thanks for looking. Feel free to comment!
-Drummeralec
Friday, April 24, 2009
Ubuntu 9.04 Announced!
I'm on the run, (Have a percussion competition tomorrow and designing a logo for someone,) but just want to post about the new version of Ubuntu that was just announced: 9.04
Just FYI for some people, Ubuntu is a linux operating system. I will talk about these and how to install/use them in later posts. I like it and sometimes use it along with Linux Mint and other linux distros. I have not tried the new '9.04' yet, but i have heard good things about it. Check it out here!
-Drummeralec
Feel free to comment!

Just FYI for some people, Ubuntu is a linux operating system. I will talk about these and how to install/use them in later posts. I like it and sometimes use it along with Linux Mint and other linux distros. I have not tried the new '9.04' yet, but i have heard good things about it. Check it out here!
-Drummeralec
Feel free to comment!
Monday, April 20, 2009
News Bumper Animation Made In Blender
This was for a project at our school. Our school news station is called "Jag News", and we had to make a bumper to show before the news starts. I worked on this with a partner. We were under a time limit, and we had to render on school computers so this did not turn out as High-Quality and the animation was not as smooth as we wanted it to be, but here it is-
Jag News Bumper - Alec and Eric from CeVMS on Vimeo.
Maybe someday I will revisit this and fix all the little things, but we had lots of fun making this. Feel free to leave comments!
-Drummeralec
Jag News Bumper - Alec and Eric from CeVMS on Vimeo.
Maybe someday I will revisit this and fix all the little things, but we had lots of fun making this. Feel free to leave comments!
-Drummeralec
Sunday, April 19, 2009
Blender: Tricks of the trade #2
A couple weeks ago I published "Blender: Tricks of the trade #1", which showed you some tricks to help you with blender. In this post, I will show you how to use hotkeys to speed up making animations in blender.
Hot Keys are Your Friend!
One major hotkey is “Shift”, you can push this key with just about everything to make your life easier. For example, when clicking on almost anything in Blender using the shift key, you can select more than one thing. You can select layers, manipulators, or selecting anything in the 3D View Window (Faces, edges, you get the idea). Selecting objects can be much easier when holding down shift. Also, the shift key works a lot like the "ctrl" key when rotating, grabbing, or scaling, although shift locks the movement to smaller increments. There are many more basic things you can do with the "shift" key in blender, such as duplicating or "copying" objects with shift+d. You can see more info ont the shift key here.
Another unique hot key in Blender is the "Alt" key. I think of this key as the second "undo" key in blender (aside from ctrl-z). For example, pushing "alt+ g" will clear the location of you object. Likewise, pushing "alt+r, alt+s, and alt+p" will clear rotation, scaling, and parents.
In general, hot keys can be very useful in blender. You can increase your time-management in blender tenfold if you get used to using them. For reference, here is a hot key map for use in blender, but I find it easiest to just experiment with pushing different keys - you might be surprised with what you find!
More tips and tricks coming soon. Feel free to comment!
-Drummeralec
Hot Keys are Your Friend!
One major hotkey is “Shift”, you can push this key with just about everything to make your life easier. For example, when clicking on almost anything in Blender using the shift key, you can
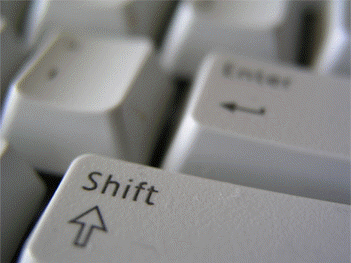 select more than one thing. You can select layers, manipulators, or selecting anything in the 3D View Window (Faces, edges, you get the idea). Selecting objects can be much easier when holding down shift. Also, the shift key works a lot like the "ctrl" key when rotating, grabbing, or scaling, although shift locks the movement to smaller increments. There are many more basic things you can do with the "shift" key in blender, such as duplicating or "copying" objects with shift+d. You can see more info ont the shift key here.
Another unique hot key in Blender is the "Alt" key. I think of this key as the second "undo" key in blender (aside from ctrl-z). For example, pushing "alt+ g" will clear the location of you object. Likewise, pushing "alt+r, alt+s, and alt+p" will clear rotation, scaling, and parents.
In general, hot keys can be very useful in blender. You can increase your time-management in blender tenfold if you get used to using them. For reference, here is a hot key map for use in blender, but I find it easiest to just experiment with pushing different keys - you might be surprised with what you find!
More tips and tricks coming soon. Feel free to comment!
-Drummeralec
Saturday, April 18, 2009
Why I switched from Outlook to Thunderbird, and Why IMAP is Awesome.

First off, I would like to point out that i use Gmail for my main email client. I have been using Gmail for 3 years now. I have tried Yahoo, AOL, and a couple others, but nothing tops the features of Gmail.
Secondly, I have also been using outlook for a couple years now. I was downloading via POP3 from Gmail, and i was really starting to hate it. The main problem was, I could only use outlook on my desktop. On my laptop and school computers, I would have to use Gmail online. One day, I was waiting for an important email from a friend. I was on my laptop, and he said he'd sent it to me. What I didn't realize was my desktop was on and already got the email and downloaded it to Outlook.
I had to search through my Gmail folders for a while to find the message and reply to it. When I got home and got to my desktop, I looked in outlook and the email was marked as unread. This was a problem in my mind, because it was going to get confusing as to what emails i have replied to and witch i have not.
Then my friend pointed out an easy solution: IMAP. I was using POP3, but it was not working too well. I did not know much about how downloading emails worked, so I did some researching. First off, IMAP stands for Internet Message Access Protocol And POP3 stands for Post Office Protocol version 3. These are both part of the Internet Protocol Suite, but they seem to be the most popular for downloading emails.
Basically, POP3 downloads emails to your computer, and IMAP gives your computer access to your inbox. (In Gmail).
For POP3, Gmail gives you some options for after you download the email to your computer. It can archive it (put it in the "all mail" folder), delete it, or keep it in your inbox. This may be nice for some people with one computer, but it got confusing using it on multiple computers for me.
 On the other hand, IMAP gives you the option for your inbox to be the same, and always updated no matter what computer you are on. The downside is, though, if your not connected to the Internet you will have to use your email program's "offline" mode, and if it doesn't have an offline mode you can't view your email. But that's not a problem if you have something like Thunderbird.
Now, I have Thunderbird on all my computers, and my inbox stays updated. The other problem was getting my Gmail calender updated on all my computers with Thunderbird, but this did the trick.
Here are some links you might find useful if you want to download anything or get some more information.
Download Thunderbird- http://www.mozillamessaging.com/en-US/thunderbird/
Info on Syncing Gmail with Thunderbird - http://mail.google.com/support/bin/answer.py?answer=77662
Info on POP3 and IMAP - http://www.unitedhosting.net/support/faq/5.1.php
How-to on This Coming Soon!
Have any Questions or comments? Leave a comment and I'll be glad to respond to them!
-Drummeralec
Monday, April 13, 2009
Learning C
Just a little update about myself: I'm learning C! (The programing language, not the letter. ;) ) I already know some Python and Java, and I thought I should master a language. Why C? Well, why not! It's fairly simple, and once you know it you can easily learn other languages. Since I already know the basics of programing (In general), I'm using http://aelinik.free.fr/c/ to learn and Microsoft Visual C++ (and the IDE that comes with it) to code. (I'm using GCC in Linux, but i find programing C in windows easier.)
If anyone has any advise they could give me, or any links to good C or C++ resources to use that would be awesome-tastic :). (Just leave a comment!)
-Drummeralec
Tuesday, March 3, 2009
Blender: Tricks of the trade #1
 Whether you are a Blender mastermind, or your just learning blender, you will enjoy this post. Here is a list of different blender tricks that some people don't know about. Some of these are useful, and some are just fun, so i suggest you try them for yourself. :)
I will try to post different Blender tricks about once a week. If you subscribe or just read regularly, you can really master the "Art" of Blender.
1.Camera Fly Mode

Enter blender and hit Shift-f. Watch what happens. Blender has a built in "Flight Simulator!" Well, not really, but camera fly mode is kind of cool. You can use your mouse wheel and mouse to aim your camera and move around. It can be useful when animating or positioning the camera, but hey, you have to admit, it's pretty fun. ;)
2. Zoom In/Track The Camera
While in Camera View (NUM 0) select the camera, and push "G" then "ZZ" (Press z twice). This will let you grab the camera on the local "z" axis. You can also do this for the y and x axis to rotate the camera. If you play around with it, it can become really useful when positioning the camera.
That's it for today. Come back later for more blender tips. Thanks!
-Drummeralec
Friday, February 27, 2009
VirtuaWin - The Virtual Desktop Manager For Windows
 For all the Linux geeks out there using Virtual desktops, Yay for you. They keep everything neat and organized, and they provide extra work space. I especially like them when using blender along with tutorials, so you can switch from blender to your web browser easily, without any confusion. But what about windows? A lot of people think Windows can't handle virtual desktops just because its, 'Windows' (Hints the name). Well, it can. For free too. :)
Software- "VirtuaWin"
My Rating - 4/5
License - Free
Pros - Simple, Customizable Hot keys & mouse, Run as many as 9 desktops
Cons: No 3d Effects (Such as a desktop Cube)
CNET Editor's Rating - None Yet
Operating Systems -Windows Vista, Windows 95, Windows Me, Windows XP, Windows 2000, Windows NT, Windows 98
Website - http://virtuawin.sourceforge.net/
Website Description - "VirtuaWin is a virtual desktop manager for the Windows operating system (Win9x/ME/NT/Win2K/XP/Win2003/Vista). A virtual desktop manager lets you organize applications over several virtual desktops (also called 'workspaces'). Virtual desktops are very common in Unix/Linux, and once you get accustomed to using them, they become an essential part of a productive workflow." (http://virtuawin.sourceforge.net/)
Overall, i think this is a great software for graphic designers, or any daily computer user. Check it out! Comment and tell me what you think!
-Alec
Wednesday, February 25, 2009
Totally Blended
Hey guys. Quick post- Just wanted to share this awesome site with yall-
http://www.totallyblended.com/facelift/tutorials.php
Its a site full of great tutorials that i really like. I think you should check them out.
Here is a video i made using a tutorial on that site - "The Black Hole". Hope you like it! :)
The Black Hole - Blender Animation from Alec E on Vimeo.
http://www.totallyblended.com/facelift/tutorials.php
Its a site full of great tutorials that i really like. I think you should check them out.
Here is a video i made using a tutorial on that site - "The Black Hole". Hope you like it! :)
The Black Hole - Blender Animation from Alec E on Vimeo.
Saturday, February 21, 2009
Website Design: Some Good Examples
Nowadays, everyone is wanting there own website. Sure, anyone can find a template or start a blog , but if your anything like me, you would want to start from scratch. I suggest first browsing some sites (like the one you intend on making) that are good examples of good web design. Here are some examples of good sites:
 http://www.mozilla.org/
The tabs at the top of this website support easy navigation, and the good logo and search bar add nice finishing touches.
http://www.wikispaces.com/
The ease of use and great features on this site make it a great example of good web design.
http://www.forecastadvisor.com/
Once again, the use of tabs make this a great design. (Although the use of some ads makes it a "not-so-great" Design, but its still good)
http://www.facebook.com/
I love everything about Facebook's new design, it is awesome.
http://www.apple.com/
Good overall site.
The list goes on, but i think you get the idea :)
Also, just for the the fun of it, here are some websites that are so bad it's funny.
http://www.havenworks.com/
Enough said.
http://www.brillpublications.com/
Wow....lol
Well, i hope you get the idea. Happy designing!
-Drummeeralec
 http://www.mozilla.org/
The tabs at the top of this website support easy navigation, and the good logo and search bar add nice finishing touches.
http://www.wikispaces.com/
The ease of use and great features on this site make it a great example of good web design.
http://www.forecastadvisor.com/
Once again, the use of tabs make this a great design. (Although the use of some ads makes it a "not-so-great" Design, but its still good)
http://www.facebook.com/
I love everything about Facebook's new design, it is awesome.
http://www.apple.com/
Good overall site.
The list goes on, but i think you get the idea :)
Also, just for the the fun of it, here are some websites that are so bad it's funny.
http://www.havenworks.com/
Enough said.
http://www.brillpublications.com/
Wow....lol
Well, i hope you get the idea. Happy designing!
-Drummeeralec
Monday, November 17, 2008
Open Source Software
You don't need to spend thousands of dollars on professional design software, all you need is free. Most people know about Open Source and free software, but few know about what some programs can do. Here is a list of free software i would recommend, and i will start posting tutorials on some of them on this blog.
The List
Photo Editing
-Gimp
Gimp is a program almost just like Photoshop, and it has a bunch of capabilities for photo editing.

Video Editing
Was is a great programing for video editing, and it can do a lot of cool effects!
(Also, Blender can be used for Video Editing, and it is a great tool. Hopefully later i can post a tutorial on how to edit videos in blender.)
3D Modeling
Do i even have to say it? Blender is by far the best (free) software for 3d modeling. Also, it can do a ton more, and i will post a lot about blender on this blog.
Vector Graphics Editor
Like i told you in this post, Inkscape is a great vector graphics program for just about anything.
Well, there you have it. Those are the main programs we will be looking at on this blog, so i hope you can subscribe and keep reading!
Thanks!
-Drummeralec
Monday, November 10, 2008
Inkscape Tutorial #1 - Adding a drop shadow
Inkscape Tutorial #1 - Adding a drop shadow
In this tutorial, i will show you how to make a simple drop shadow for different objects. If you don't know what Inkscape is, i recommend you read this post to find out more and how to download it. Once you download it, you can continue reading!
WARNING!: Before you try this tutorial, i HIGHLY recommend reading Inkscape's basic tutorial. It will show you the basics of the program, and its built right into the program and easy to follow. Just open Inkscape, and navigate to Help>Tutorials>Inkscape:basic
Step 1.
Open Inkscape and make a basic star shape. To do this click on the icon on the left toolbar with a picture of a yellow star and polygon on it (or just click Shift+8), then click and drag anywhere in your main window. It doesn't matter how big or where it is right now, all you need is a star.
WARNING!: Before you try this tutorial, i HIGHLY recommend reading Inkscape's basic tutorial. It will show you the basics of the program, and its built right into the program and easy to follow. Just open Inkscape, and navigate to Help>Tutorials>Inkscape:basic
Step 1.
Open Inkscape and make a basic star shape. To do this click on the icon on the left toolbar with a picture of a yellow star and polygon on it (or just click Shift+8), then click and drag anywhere in your main window. It doesn't matter how big or where it is right now, all you need is a star.

Step 2:
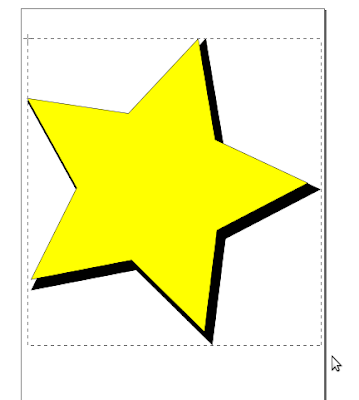
Now we need to duplicate the object. Do this by selecting the star and going to Edit>Duplicate (Or just hit Ctrl+D). Now you have 2 of the same star shapes. We will use one of these shapes for the drop shadow. We need to make one of the stars black, for our shadow. Look at the bottom of your Inkscape window. Do you see a bunch of little rectangles that are different colors? You should. These can be used to color objects, and that's what we are going to use today. Select the top star shape, and click on the little black rectangle on the bottom. (The one all the way to the left). Your star should turn black. But their is a problem: The black star is still on top; it should be on bottom. We can fix this by selecting the black star and going to - Object>Lower. (Or just push Page Down). Now your black star is under the yellow one, but don't deselect it yet! We are still going to use the black one in the next step. ;)
Step 3: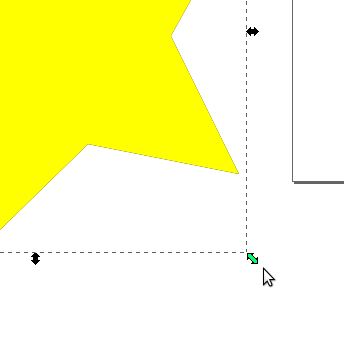
Now we can scale up the black star to make it look like a shadow. With the black star still selected, we can now scale it up. Holding down "Ctrl" (To keep it proportional) and click the black arrows at the bottom right of the selection box and drag.
 Step 4:
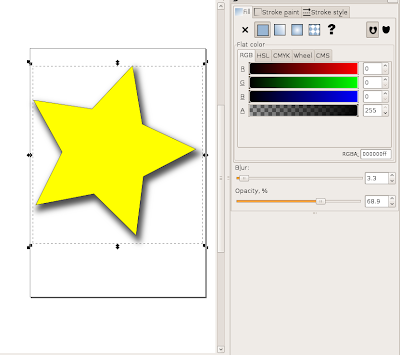
Now that we have a basic shadow, we need to touch it up. With the shadow still selected, goto Object>Fill and Stroke. (Or just hit Shit+Ctrl+F). Now a window labeled "Fill and Stroke" will pop up. We will make the shadow look more "Realistic" by blurring it and lowering the opacity. I recommend setting the blur to around 3.3 and the opacity to around 68.9%. (You can play around with it to get it looking the way you want it.)
And there you have it! You can export your star by going to FIle>Export Bitmap (Basically saving it as a .png picture file.)Select "Drawing" At the top, then browse for where you want to save your picture. When you are done, click "Export" and Inkscape will do the rest. ;)
And here is your completed star! -
 Please comment with any suggestions or comments, Positive or negative ;) Also remember, I make these tutorials my self, (Unlike other blogs who just copy and paste from other sites), so if you happen to use this on your site or blog or whatever, please link back to me! (http://alecsgraphics.blogspot.com) ;)
Thanks! Check back later for more great tutorials and posts!
-Drummeralec
Now we need to duplicate the object. Do this by selecting the star and going to Edit>Duplicate (Or just hit Ctrl+D). Now you have 2 of the same star shapes. We will use one of these shapes for the drop shadow. We need to make one of the stars black, for our shadow. Look at the bottom of your Inkscape window. Do you see a bunch of little rectangles that are different colors? You should. These can be used to color objects, and that's what we are going to use today. Select the top star shape, and click on the little black rectangle on the bottom. (The one all the way to the left). Your star should turn black. But their is a problem: The black star is still on top; it should be on bottom. We can fix this by selecting the black star and going to - Object>Lower. (Or just push Page Down). Now your black star is under the yellow one, but don't deselect it yet! We are still going to use the black one in the next step. ;)
Step 3:

Now we can scale up the black star to make it look like a shadow. With the black star still selected, we can now scale it up. Holding down "Ctrl" (To keep it proportional) and click the black arrows at the bottom right of the selection box and drag.
 Step 4:
Now that we have a basic shadow, we need to touch it up. With the shadow still selected, goto Object>Fill and Stroke. (Or just hit Shit+Ctrl+F). Now a window labeled "Fill and Stroke" will pop up. We will make the shadow look more "Realistic" by blurring it and lowering the opacity. I recommend setting the blur to around 3.3 and the opacity to around 68.9%. (You can play around with it to get it looking the way you want it.)

And there you have it! You can export your star by going to FIle>Export Bitmap (Basically saving it as a .png picture file.)Select "Drawing" At the top, then browse for where you want to save your picture. When you are done, click "Export" and Inkscape will do the rest. ;)
And here is your completed star! -
 Please comment with any suggestions or comments, Positive or negative ;) Also remember, I make these tutorials my self, (Unlike other blogs who just copy and paste from other sites), so if you happen to use this on your site or blog or whatever, please link back to me! (http://alecsgraphics.blogspot.com) ;)
Thanks! Check back later for more great tutorials and posts!
-Drummeralec
Saturday, November 8, 2008
Inkscape - An Open Source vector graphics editor
Inkscape - The free program you have to see to believe.
Ok, So you don't know a thing about computers or graphic design. All you want to make is a simple logo or image, (Like the one at the top of this blog), but you have no idea to do it, and you need to make it quick. Well, i have an answer for 
"Inkscape is An Open Source vector graphics editor, with capabilities similar to Illustrator, CorelDraw, or Xara X, using the W3C standard Scalable Vector Graphics (SVG) file format." (From: http://www.inkscape.org/)
Basically, Inkscape is a program that can make, well, anything. (it's like a more powerful version of paint). It saves files in SVG format, and it is vary useful for editing text and logos. If you don't know what inkscape is or how to u
You can download inkscape here-
http://inkscape.org/download/?lang=en (Inkscape works in Windows, OSX, and Linux.)
Hope you can subscribe and continue reading! I will also post tutorials on programs like gimp, blender, and other open source programs.
Thanks!
-Drummeralec
Thursday, November 6, 2008
Dell Monitors Made in Blender
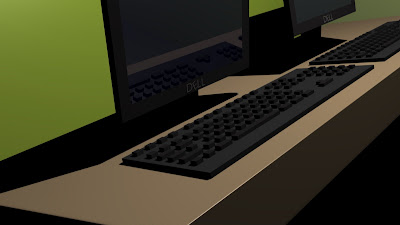
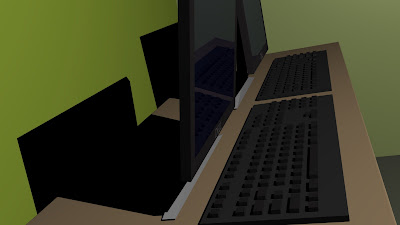
About a week ago, one of my friends asked me to make a realistic "dell" computer (monitor) in blender. He did not have a reason for it, but me being, well, me, i quickly took on the challenge. Of course, he asked me in our multimedia Class, (Basically a Computer Science Class), so i made my 3d image look like the computers in the class.
This is just a quick little "mini" project, but, i might as well post it on my new blog, just to see what people think. For the textures i did nothing "complicated", just basic colors and a mirror effect on the monitor. I added a couple different angles, but here it is. Its nothing special, but at least its something. ;)
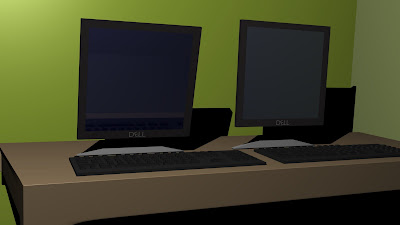 P.S. I know, I know. I did not make a mouse or the actual tower of the computer. I could have, but i decided to move on to something new after i got the keyboard. Thanks, Hope you can keep reading my blog!
-Drummeralec
This is just a quick little "mini" project, but, i might as well post it on my new blog, just to see what people think. For the textures i did nothing "complicated", just basic colors and a mirror effect on the monitor. I added a couple different angles, but here it is. Its nothing special, but at least its something. ;)


 P.S. I know, I know. I did not make a mouse or the actual tower of the computer. I could have, but i decided to move on to something new after i got the keyboard. Thanks, Hope you can keep reading my blog!
-Drummeralec
Subscribe to:
Posts (Atom)



 Posts
Posts


