
Inkscape Tutorial #1 - Adding a drop shadow
In this tutorial, i will show you how to make a simple drop shadow for different objects. If you don't know what Inkscape is, i recommend you read this post to find out more and how to download it. Once you download it, you can continue reading!
WARNING!: Before you try this tutorial, i HIGHLY recommend reading Inkscape's basic tutorial. It will show you the basics of the program, and its built right into the program and easy to follow. Just open Inkscape, and navigate to Help>Tutorials>Inkscape:basic
Step 1.
Open Inkscape and make a basic star shape. To do this click on the icon on the left toolbar with a picture of a yellow star and polygon on it (or just click Shift+8), then click and drag anywhere in your main window. It doesn't matter how big or where it is right now, all you need is a star.

Step 2:
Now we need to duplicate the object. Do this by selecting the star and going to Edit>Duplicate (Or just hit Ctrl+D). Now you have 2 of the same star shapes. We will use one of these shapes for the drop shadow. We need to make one of the stars black, for our shadow. Look at the bottom of your Inkscape window. Do you see a bunch of little rectangles that are different colors? You should. These can be used to color objects, and that's what we are going to use today. Select the top star shape, and click on the little black rectangle on the bottom. (The one all the way to the left). Your star should turn black. But their is a problem: The black star is still on top; it should be on bottom. We can fix this by selecting the black star and going to - Object>Lower. (Or just push Page Down). Now your black star is under the yellow one, but don't deselect it yet! We are still going to use the black one in the next step. ;)
Step 3: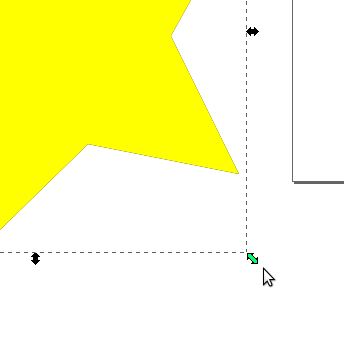
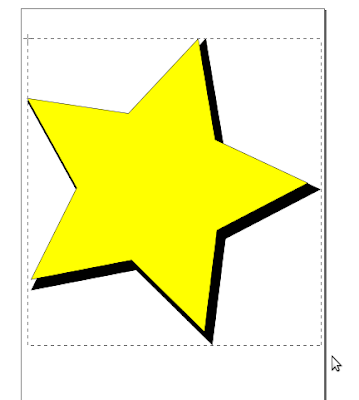
Now we can scale up the black star to make it look like a shadow. With the black star still selected, we can now scale it up. Holding down "Ctrl" (To keep it proportional) and click the black arrows at the bottom right of the selection box and drag.
 Step 4:
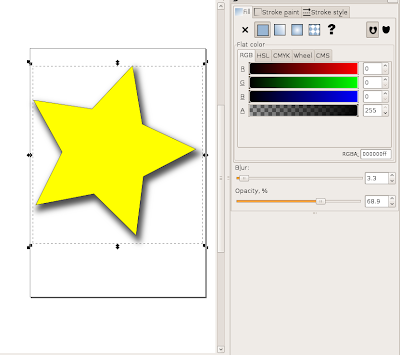
Now that we have a basic shadow, we need to touch it up. With the shadow still selected, goto Object>Fill and Stroke. (Or just hit Shit+Ctrl+F). Now a window labeled "Fill and Stroke" will pop up. We will make the shadow look more "Realistic" by blurring it and lowering the opacity. I recommend setting the blur to around 3.3 and the opacity to around 68.9%. (You can play around with it to get it looking the way you want it.)
And there you have it! You can export your star by going to FIle>Export Bitmap (Basically saving it as a .png picture file.)Select "Drawing" At the top, then browse for where you want to save your picture. When you are done, click "Export" and Inkscape will do the rest. ;)
And here is your completed star! -
 Please comment with any suggestions or comments, Positive or negative ;) Also remember, I make these tutorials my self, (Unlike other blogs who just copy and paste from other sites), so if you happen to use this on your site or blog or whatever, please link back to me! (http://alecsgraphics.blogspot.com) ;)
Thanks! Check back later for more great tutorials and posts!
-Drummeralec
Now we need to duplicate the object. Do this by selecting the star and going to Edit>Duplicate (Or just hit Ctrl+D). Now you have 2 of the same star shapes. We will use one of these shapes for the drop shadow. We need to make one of the stars black, for our shadow. Look at the bottom of your Inkscape window. Do you see a bunch of little rectangles that are different colors? You should. These can be used to color objects, and that's what we are going to use today. Select the top star shape, and click on the little black rectangle on the bottom. (The one all the way to the left). Your star should turn black. But their is a problem: The black star is still on top; it should be on bottom. We can fix this by selecting the black star and going to - Object>Lower. (Or just push Page Down). Now your black star is under the yellow one, but don't deselect it yet! We are still going to use the black one in the next step. ;)
Step 3:

Now we can scale up the black star to make it look like a shadow. With the black star still selected, we can now scale it up. Holding down "Ctrl" (To keep it proportional) and click the black arrows at the bottom right of the selection box and drag.
 Step 4:
Now that we have a basic shadow, we need to touch it up. With the shadow still selected, goto Object>Fill and Stroke. (Or just hit Shit+Ctrl+F). Now a window labeled "Fill and Stroke" will pop up. We will make the shadow look more "Realistic" by blurring it and lowering the opacity. I recommend setting the blur to around 3.3 and the opacity to around 68.9%. (You can play around with it to get it looking the way you want it.)

And there you have it! You can export your star by going to FIle>Export Bitmap (Basically saving it as a .png picture file.)Select "Drawing" At the top, then browse for where you want to save your picture. When you are done, click "Export" and Inkscape will do the rest. ;)
And here is your completed star! -
 Please comment with any suggestions or comments, Positive or negative ;) Also remember, I make these tutorials my self, (Unlike other blogs who just copy and paste from other sites), so if you happen to use this on your site or blog or whatever, please link back to me! (http://alecsgraphics.blogspot.com) ;)
Thanks! Check back later for more great tutorials and posts!
-Drummeralec


1 comment:
Nice. Are you going to make any new articles soon or too busy? ;)
Post a Comment